(4/24/2022)
Out of the box, its unlikely your monitor is properly calibrated. Even Macs with a retinal display can drift out of calibration after repeated power surges, thousands of On/Off cycles and years of letterboxing from daily streaming activities.
It’s strange but there are hundreds of factors that can affect screen calibration over time. So much so, that on most professional sets camera sensors and screens are calibrated daily to maintain peak integrity between days and shooting conditions.
Luckily there are many free ways to address monitor calibration that all yield good results. You can either calibrate by eye, or by using a device called a colorimeter. If you have a colorimeter, you probably know how to use it. If not, we have another article on how to use it if its your first time operating.
One thing to bear in mind before you start any calibration is to know what you are calibrating for. A lot of technology systems use the RGB color space. Mac and higher end phones and cameras may use Adobe RGB, which displays more greens and yellows than standard RGB. The guide below illustrates this.
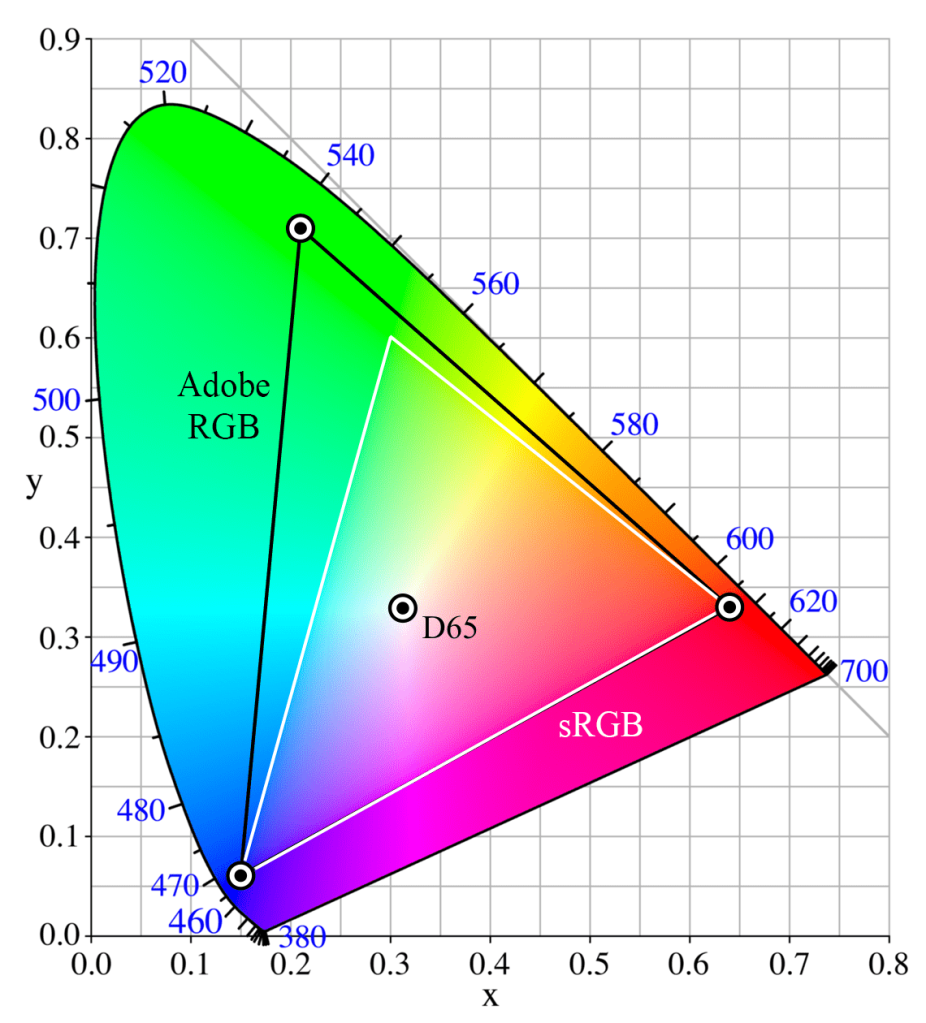
WHITE TRIANGLE: sRGB
sRGB Color Space. Public Domain image.
As you can see, Adobe RGB has more colors. If you are working on a movie or photo that was colored in Adobe RBG, viewing on a monitor only capable of RGB…results may be different or unexpected. This is especially important when collaborating between departments or the various stages of production leading up to color.
Before you start to calibrate:
- Let your monitor warm up for 30 minutes
- Make sure its in its native resolution…or the highest resolution it supports.
- If you are on an older device that plugs into any cable other than an HDMI cable, you need to start with a brand new cable.
- Well-calibrated mid-tones should be the highest priority. These tones are the first thing people usually notice.
- DEFAULT OS CALIBRATION – In Windows & Mac, there are utilities available for free that offer for some quick and basic calibration.
WINDOWS: Search for “calibrate display color” and you should be taken to a menu that offers simple step-by-step instructions on how to get your monitor closer to true color. It’ll walk you through gamma, brightness and contrast, and color balance, and before finishing offer you the opportunity to turn on ClearType, which attempts to make things “sharper.”
MAC OSX: Go to System Preferences > Display and click on the Color tab. Next, click the Calibrate button. Display Calibrator Assistant will open, and offer you the option to use “Expert Mode”. This option allows you to better fine tune white points and gamma, or luminance.
- HARDWARE SETTINGS – Sometimes, settings on monitors themselves are changed. Often-times there is a tendency to increase contrast which usually allows for seemingly more definition, however this can result in artifacts, crushed blacks, or exaggerated shadows. This is usually one of the last things we adjust.
Older and cheaper monitors use lower-quality diodes and silicon that often deteriorates faster. This deuteriation may cause irreversible tinting issues but you can force the hardware into giving you a more accurate image.
You can start by using the Lagom LCD monitor test pages and cycling though the menu setting on your monitor for a variety of settings. Even utilizing a few settings can help bring out the best in your monitor.
Cambridge in Color, has a great tutorial that will help show you exactly what to look for.
- SOFTWARE-BASED CALIBRATION. This option yields mixed results. If its a hardware issue, you may not fix the issue with ay of these programs. Both programs we list have helped various clients with various literacy when it comes to technology and are what we have designated in-house for calibration.
- NaturalColorPro. This is a great, free program that’s actually made by Samsung. Its ideal if you want noticeable improvements, fast. It takes into account types of screens as well, CRT, LCD, etc.
You can also use it on consumer TV models. The only real issue is that its Windows only. - DisplayCAL. This is a more professional program that allows you to measure and calibrate your monitor with the use of a colorimeter. It has vast options available and we actually use this program to design luts to load onto our field monitors for on-set work. There is an option to use it without a colorimeter but we have not personally tested it.
This is just the tip of the iceberg when it comes to color, but should be enough to get you started! All-in-all, its nice knowing with confidence that you are looking at true color, and seeing footage for what it really is and as artists, and yourself alike, have intended.
