A Creatives 5-Minute Guide to DCP Exports

Digital Cinema Package. Put simply, its the digital equivalent of a 35mm print and it is the worldwide standard for screening your film in theaters. Conventionally, Post Houses will ship your film to your desired location on a CRU drive that look like this:

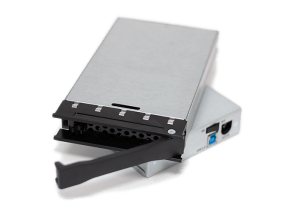
Most independent houses will likely deliver your film on an SSD or Lacie Drive but you’d need to be sure that’s acceptable for where you’re sending for distribution. We at NXTLVL typically deliver on CRU drives. There is no technical difference in using either type of drive, CRU drives are just traditional.

It is possible to deliver DCP files digitally but due to the size of the DCP file it is usually easier to ship it physically on a drive. DCPs have 8x more data on it than a blu ray, and 27x the data of a DVD. In addition, other than POS systems, theaters are not connected to any open internet sources for security reasons.

When you receive your drive, your machine will likely not be able to read or play the files. This is because they must be formatted for the Linux OS and use the Extended File System (EXT). The files on the drive will look something like the image below:

Your DCP file will look something like this.

There are several different versions of the EXT format but the safest option that’s recognized by the most theaters is the EXT2 format simply because it has been the standard for so long even though EXT3 & EXT4 is more efficient.

There also other important things to consider when you know you are creating a DCP. Color, framerate, and sound.

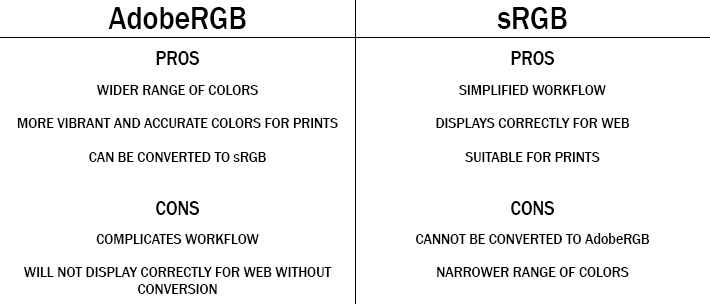
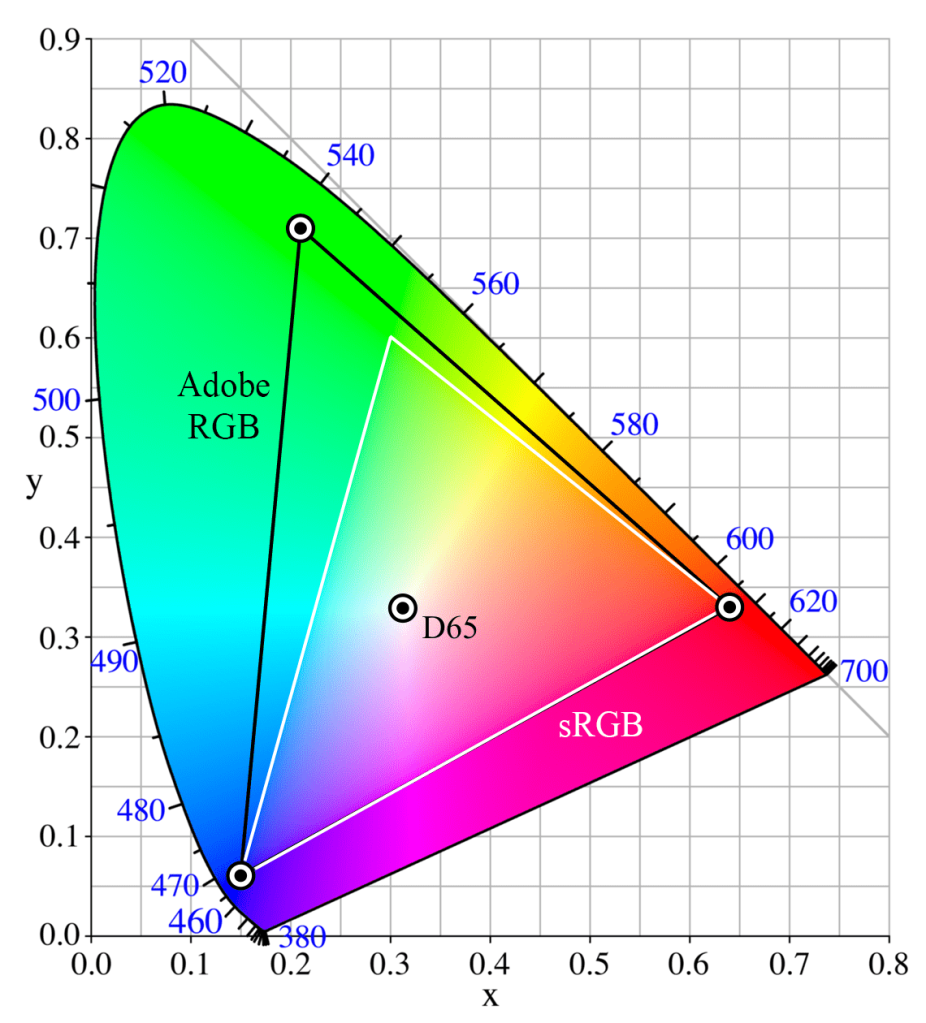
The most noticeable thing to understand about DCPs is Color Space. While most videos are encoded in RGB or sRGB. DCPs utilize the X’Y’Z color space and they use this because it most closely emulates the film color gamut.

Source: Mathworks

That is why screening in theaters looks slightly different than streaming at home but only slightly different. Its for this reason that NXTLVL Interactive performs QC checks on a projected screen and on several different monitors to ensure there are no abnormalities.

Next, framerates. There are two types of DCP formats used today; IOP & SMPTE. The older IOP format only supports 24fps or 48fps, while the newer SMPTE allows for a wider range of frame rates including 24, 25, 30, 48, 50, and 60.

Most Hollywood studios and almost all newer theaters have switched over to SMPTE as of 2019, however you may still encounter a theater that only supports the IOP format. Either way you are only allowed integer formatting which will require you to convert your 23.98 fps footage into 24fps most likely.

This means you’ll have to “conform” the footage by telling your project file to play each frame for a slightly shorter amount of time. Which means you’ll also have to account for this in your audio as by adding two-pops and tail-pops to ensure your audio is in sync.

Lastly, in regards to audio, a DCP requires a 5.1 or 7.1 mix. If you only have a stereo mix your DCP may get rejected by a movie theater, it simply won’t sound good and it will be excruciatingly loud.

For streaming deliverables this is typically not an issue, however your audio will sound “hollow and 1-dimensional” on older devices.

DCP FAQ

How much should a DCP Cost? A feature-length DCP can range in price from 1500.00 – 4000.00 not including hard drive costs. That price usually includes mastering, quality control, and (1) master DCP hard drive. Additional copies are usually less than $500.00 and can be as cheap as $150.00 if you provide the HD.

How long does it take to make a DCP? A DCP can comfortably generated in 5-7 business days.

Can I make a DCP myself? Yes, but it will not necessarily save you money. Because of the differences in frame-rates, audio, and color space the risks of not performing proper Quality Control will likely cost you the same or more.

My DCP got rejected, what now? The most common reason for DCP rejection is improper conforming or pull-downs. We can fix them by accessing your source files and conforming it on our end.

There you have it! if you know you are creating a DCP you should communicate that to your Post providers in advance for them to account for the slight differences DCP formatting. If you have any questions, reach out to us at any time via our Contact Page!

Written by: Cornell Mitchell, 11/29/2022

Textures Purple in Blender 3D (FIXED)

If you open an .obj or .fbx and it’s purple, its a pathing issue.

Contrary to popular reddit posts, you’re not screwed. The fix is quite easy.

This is a simple file-path issue that sometimes happens when the source files are moved to a different path. This is often the case with Sketchfab assets or other 3D assets from 3rd party site.

To fix this you simply have to reconnect the textures to their NEW paths. The following gifs will show you the simplest way to do this!

  1. Select the objects Navigate to the texture in Blender.
  2. Find the image texture nodes in Blender.
  3. Navigate to the folder where you are holding your desired texture image.

That’s it! To avoid this issue in the future, its a good practice to keep textures, source, and project files all in the same folder. Happy Rendering!

Video files look different on different devices. (ANSWERED)

You spend hours working on footage, you get it perfect, it looks amazing. Export…and now it looks like trash. Why?

Different devices work in different color spaces with different pixel shapes and sizes. All of these things affect how color looks. Sony devices tend to handle blues and greens exceptionally well, whereas Apple devices display a much broader variety of greens and significantly more yellows.

Canon monitors & sensors do yellows and African American skin tones very well, whilst other monitors may make skin tones appear more “muted” and grey. In addition, your phone likely has smaller pixels / higher pixel density. This will make the details look sharper.

A more explicit example from a 15โ€ณ MacBook Pro has a 10-bit 2880×1800 display (can display a little over 1.1 million different colors at 220 pixels per inch covering 99% of the sRGB color space), but a Dell XPS 15 with the 4K UHD (3840×2160) is just a 6-bit display (can display only 262 thousand colors but with 282 pixels per inch and covers 95% of the sRGB color space) โ€” cheaper displays are even worse are reproducing color (source: James McInnis)

3 THINGS TO CHECK

  1. COLOR GAMUT – Color Spaces are important to understand. Most consumer television / monitors are on the sRGB color space, whilst Apple devices are on the adobe RGB color space.

    Adobe RGB has a wide variety of colors that gives a way more accurate image, but it is important to note that it is not always best final product as web 2.0 only allows for sRGB and it is viewed as the universal standard.

    It is usually a good practice to start a project in adobe RGB, and save a copy that is converted to sRGB.
  1. HARDWARE OPTIMIZATION – No surprise here that hardware optimization is one of the first things to check, it makes a huge difference in render previews. If you have noticed a difference between what you have exported vs what you are seeing in the preview, this is the reason.

    If your issues are color related, you are looking for the place to check is in: Edit > Preferences > General settings.
  1. COLOR PROFILES & MANAGEMENT – REC. 709 is the standard for all SDR video productions. Rec. 709 displays the same amount of colors as sRGB yet it has a defined gamma of 2.4 (BT.1886), a peak luminance (brightness) of 100 nits, and a D65 white point.

    Why is that important? Because these units are best for cross-platform color calibration. MOST MONITORS prosumer included have a much cooler white point. Why? (Insert corporate greed quote here).

    Rec. 2020 is fairly new, and a lot of filmmakers choose this option because of the vast upgrade in amount of visible colors. On the flipside, it has caused minor disruptions in the post process pipeline as it clashes with current-gen tech.

There you have it! There are other things you can look into but when managing these 3 very common discrepancies you can usually resolve any issues relating to displaying footage amongst many devices. There could also be calibration issues with your monitor.

If you suspect that is the case, you should check out our article on monitor calibration for Mac & PC.

Written by Cornell Mitchell, 7/4/2022

How to Properly Calibrate a monitor (Mac & PC)

(4/24/2022)

Out of the box, its unlikely your monitor is properly calibrated. Even Macs with a retinal display can drift out of calibration after repeated power surges, thousands of On/Off cycles and years of letterboxing from daily streaming activities.

It’s strange but there are hundreds of factors that can affect screen calibration over time. So much so, that on most professional sets camera sensors and screens are calibrated daily to maintain peak integrity between days and shooting conditions.

Luckily there are many free ways to address monitor calibration that all yield good results. You can either calibrate by eye, or by using a device called a colorimeter. If you have a colorimeter, you probably know how to use it. If not, we have another article on how to use it if its your first time operating.

One thing to bear in mind before you start any calibration is to know what you are calibrating for. A lot of technology systems use the RGB color space. Mac and higher end phones and cameras may use Adobe RGB, which displays more greens and yellows than standard RGB. The guide below illustrates this.

BLACK TRIANGLE: Adobe RGB
WHITE TRIANGLE: sRGB
sRGB Color Space. Public Domain image.

As you can see, Adobe RGB has more colors. If you are working on a movie or photo that was colored in Adobe RBG, viewing on a monitor only capable of RGB…results may be different or unexpected. This is especially important when collaborating between departments or the various stages of production leading up to color.

Before you start to calibrate:

  • Let your monitor warm up for 30 minutes
  • Make sure its in its native resolution…or the highest resolution it supports.
  • If you are on an older device that plugs into any cable other than an HDMI cable, you need to start with a brand new cable.
  • Well-calibrated mid-tones should be the highest priority. These tones are the first thing people usually notice.
  1. DEFAULT OS CALIBRATION – In Windows & Mac, there are utilities available for free that offer for some quick and basic calibration.

    WINDOWS: Search for “calibrate display color” and you should be taken to a menu that offers simple step-by-step instructions on how to get your monitor closer to true color. It’ll walk you through gamma, brightness and contrast, and color balance, and before finishing offer you the opportunity to turn on ClearType, which attempts to make things “sharper.”

    MAC OSX:  Go to System Preferences > Display and click on the Color tab. Next, click the Calibrate button.  Display Calibrator Assistant will open, and offer you the option to use “Expert Mode”. This option allows you to better fine tune white points and gamma, or luminance.
  1. HARDWARE SETTINGS – Sometimes, settings on monitors themselves are changed. Often-times there is a tendency to increase contrast which usually allows for seemingly more definition, however this can result in artifacts, crushed blacks, or exaggerated shadows. This is usually one of the last things we adjust.

    Older and cheaper monitors use lower-quality diodes and silicon that often deteriorates faster. This deuteriation may cause irreversible tinting issues but you can force the hardware into giving you a more accurate image.

    You can start by using the Lagom LCD monitor test pages and cycling though the menu setting on your monitor for a variety of settings. Even utilizing a few settings can help bring out the best in your monitor.

    Cambridge in Color, has a great tutorial that will help show you exactly what to look for.
  1. SOFTWARE-BASED CALIBRATION. This option yields mixed results. If its a hardware issue, you may not fix the issue with ay of these programs. Both programs we list have helped various clients with various literacy when it comes to technology and are what we have designated in-house for calibration.
  • NaturalColorPro. This is a great, free program that’s actually made by Samsung. Its ideal if you want noticeable improvements, fast. It takes into account types of screens as well, CRT, LCD, etc.

    You can also use it on consumer TV models. The only real issue is that its Windows only.

  • DisplayCAL. This is a more professional program that allows you to measure and calibrate your monitor with the use of a colorimeter. It has vast options available and we actually use this program to design luts to load onto our field monitors for on-set work. There is an option to use it without a colorimeter but we have not personally tested it.

This is just the tip of the iceberg when it comes to color, but should be enough to get you started! All-in-all, its nice knowing with confidence that you are looking at true color, and seeing footage for what it really is and as artists, and yourself alike, have intended.

5 quick tips to SOLVE Google Drive downloads/ uploads failing!

(updated, 4/21/22)

If you made it here, welcome to the wild and wacky ways of the cloud.

You started your download, and minutes, or worse… hours later you get a message that the download has failed. Unfortunately this is a very common error, but luckily also very easy to fix.

What causes “failed” or “forbidden” downloads? The list below details some of the most common reasons for this occurrence, and ways to fix it!

  1. Network Issues. More than likely your network is dropping out during the download. The longer the download, the more likely this is to happen. The fix for this can be as simple as moving closer to the source of your wifi signal, or plugging directly into your router via ethernet cable.

You could use an app like NetSpot to check your connection and potentially diagnose more complex connectivity issues. It also sounds silly, but on my personal machine, I’ve even noticed a difference in stability by simply leaving the “downloads” progress menu up. Sounds crazy, but it works.

  1. THE WAY YOU DOWNLOADED A FILE. Under some circumstances, it could be the way in which you download that is causing an issue.

    We (NXTLVL) have found that larger files (>40gbs) are best downloaded 1 at a time to ensure full download speeds and increasing the chances that individual files finish.

    In Google Drive there are several ways to download a file. For starters, you can simply click on a file and select download. If you are downloading a folder, like in the figure below, Google will attempt to Zip (compress) the folder into a .zip archive file.

    This method is likely to result in a failure if your wifi signal is week. Its also worth noting that Google drive will sometimes re-arrange the file structures that memory cards create. We don’t know why this happens, but we see this a lot with RED and Alexa footage sent via Google Drive. You can, however, reconstruct the folders manually and everything will work as intended (it’s what we usually have to do).

    DOWNLOAD METHODS:

    Download by right-clicking on the file or folder.
*downloading folders will result in .zipped files. Extract them with a free program like winrar

Another method that you can use is finding the “3 dots” located to the bottom left under your Google Account name.

“3-dot method”

Yet another way is opening up the video, and clicking on the download icon, located in the area of the “3 dots”.

Each of these ways appear to work slightly different under the hood. So from a programming perspective, if one way appears to work better than every other way on your device, stick with that way as a primary option.

  1. Security Issues. Especially when using a VPN, Google may think unusual activity is coming from your machine on a large download and will stop the download. You may be asked to verify who you are via your backup email address.


    It could be worthwhile checking the settings on your firewall or antivirus software if the above isn’t the issue. Every antivirus software is different, but you see something like “HTTPS Scanningย orย Encrypted connection scanning“. Uncheck it until your downloads complete.
  1. Browser Issues. Google’s native browser, Chrome, is problematic. It’s also heavy on machines. As a result we primarily use Firefox and Brave. Brave is our preferred in-house browser of choice for many reasons. At it’s core, brave blocks trackers and ads, saving you significant bandwidth overtime.

When testing this ourselves we achieved an extra 3.5 – 5.5 mbs average wifi Send & Receive speeds, allowing for faster uploads AND downloads. Its streamlined functionality allows for quick, reliable results.

If switching browsers isn’t an option, its possible to download without having a google account by using the “incognito / private” modes on your current browser. This will provide a more streamlined experience that won’t throttle your downloads as much.

If this still doesn’t work, you could also clear your browser cookies and cache. This works 20% of the time, right away.

  1. Power Settings. This one is a no-brainer, but if your estimated download times exceeds the time allocated for your computer to stay on before going to sleep, or powering off… you will simply need to adjust this number to accommodate the download.
  1. Memory Issues. This is a simple one, but you may be low, or out of memory. Typically you will get a notification if that’s the case. If you have a lot of processes running on your device, you may also be bottlenecked with the mount of virtual memory available to you…especially if you are on an older device.

____________________

There are also MANY OTHER issues that can arise if none of these solutions resolve your issues. If you are operating on an older Operating System, it would be best to download Google’s Desktop App for the most optimum results.

We at NXTLVL can backup and convert your files for you if all else fails! You may also want to look into Google alternatives such as CBackup.

(SOLVED) Why aren’t my R3D files opening up in premiere?

Even in 2022, we often run into bugs in commonly used commercial softwares that seem somewhat unexplainable. The fact of the matter is, a lot goes on under the hood to do even the simplest operations when it comes to video editing and transcoding. Let’s jump right in.

TO START: The most common issue for R3D files not showing up is incompatibility issues with the Red raw codec on your computer. Most notably we have noticed this issue pop up a lot with the Red Komodo. You may find yourself able to edit Red Dragon or even Weapon footage just fine, but Komodo footage may behave differently. This is normal.ย 

THE MOST COMMON FIX: Update your version of Adobe Premiere. Some of our clients have attempted to open R3D files in an older version of Adobe, in which case we have referred them to a list of supported codecs that Adobe Premiere supports.

Listed here: https://helpx.adobe.com/in/premiere-pro/using/supported-file-formats.html

80% of the time, jumping into the paid subscription model for the most recent version of Adobe will immediately remedy your issue. If this isn’t an option for you, you do have other options. 

Here’s a few other ways to potentially fix this issue that we, ourselves have guided clients throughโ€ฆ but again, check first to make sure your version of Premiere even supports the file type you are using. These issues apply to other Raw formats as well. 

  1. Import Via Media Browser – This works 20% of the time. Red footage imports differently as clips are spanned on the budget versions of the camera (<Komodo). Simply load and import from the media browser, then browse back over to your project bin.ย 
  2. Uncheck GPU Acceleration – This works 10% of the time, but as a result, your footage will play extremely slow without the help of extra processing power especially on older devices.ย 

  1. Clear the Adobe Media Cache. This works about 5% of the time. Also, this is a quick fix to a variety of issues involving playback in Premiere. We typically set our machines up to automatically deleting cache files every 90 days, however adjust this to your individual needs.

  1. Re-encode your Red footage using RedCineX pro. This option sucks, butโ€ฆit will get you a workable file minus the benefit of meta-data 100% of the time. Re-encoding to prores will get the job done. 

There you have it! Of course, if you have any questions please reach out to us and weโ€™ll be happy to help if we can!

(This article is NOT endorsed by Adobe or RED Digital Cinema)